Let’s Get It Clear: Measurements in seating – relative angles of the body
In this article we look at what we need to do to measure the angles between different parts of the body with respect to the needs of a seated person, and ultimately how these angles relate to a person’s seating system. There are important aspects that ensure one person’s measurements are consistent with the next person’s.
A standard was published in 2006 (ISO 16840-1)1 which for the first time introduced a standardised means of measuring a seated person and their seating system in a wheelchair. This is important so that one assessor’s measures are similar to the next assessor’s Inevitably the language of standards is not always an easy read, and so Kelly Waugh and Barbara Crane produced a Clinical Application Guide2 which is available for free download – all 329+ pages of it.
The ISO standard is in the process of being updated, and the Guide has been revised to represent the updated approach to making seating measurements. In addition the Guide talks the reader through the clinical relevance of each measure, and how to go about making the measures. This series of THIIS articles summarise the approaches taken to measurements of the body and of a person’s seating system: in this article we concentrate on relative angles of the human body.
First principles
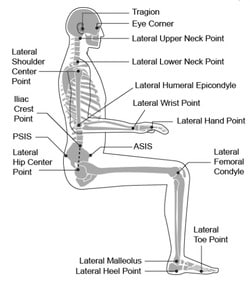
A relative angle is the angle between two straight lines where they meet. A straight line is the shortest distance between two points. What we need to do for measuring the relative angles of parts of the body is first to establish these ‘points’.
This is done in the main from selecting bony prominences that can be palpated – such as the acromion process at the shoulder (which is used to approximate to the lateral lower neck point), the greater trochanter at the pelvic end of the femur (which is used to approximate to the lateral hip centre point), the lateral femoral condyle at the knee, etc (Figure 1). (In practice this can be assisted by sticking a coloured sticker over the points once found.)

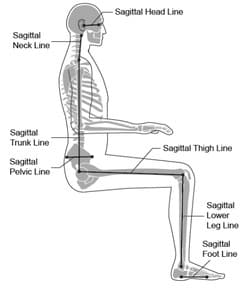
Secondly, we establish a line by joining two points together. For the thigh this would be the line between the lateral femoral condyle and the greater trochanter, and is known as the sagittal thigh line. For the trunk, this would be the line between the greater trochanter and the acromion process, and this is known as the sagittal trunk line. Figure 2.

Relative angles
A relative body angle will be the angle between two adjacent lines. Most of the movements available between different segments of the body related to seating occur in the sagittal plane, and thus the relative angles between two adjacent body sections are measured as viewed sagittally, i.e. from the side of the individual. To be standardised, this plane is always viewed from the person’s right, even if you are measuring what is happening on the left side of the person.
In practice, the angles are measured by aligning a goniometer along the two sagittal body segment lines of the adjacent body segments being measured (see below). Any angle can be measured on one of two sides. For consistency and clinical intuitiveness, the flexion side of the joint is chosen. In most situations, this will result in a number less than 180 degrees.
Example – thigh to trunk angle
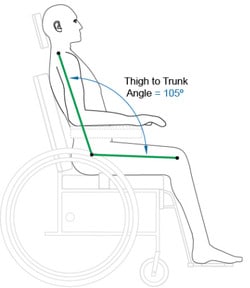
The most common relative angle of interest in seating is the thigh to trunk angle. The clinical relevance is that the thigh to trunk angle is a reflection of the position of hip flexion, and it can be used to help determine the desired seat to back support angle in the case of a single angle (straight) back support.
This angle then also relates to the angle that a back support can be reclined to. (Note that the angle – as shown in Figure 3 – is the supplementary angle to the usually ascribed angle of hip flexion of 75o.)

Thigh to trunk angle
Type of Measurement: Relative body segment angle, right and left
Description: The angle between the thigh and the trunk, viewed from the side.
Landmarks used:
- Greater trochanter for Lateral hip centre point (centre of rotation)
- Lateral femoral condyle
- Acromion process for Lateral lower neck point
Body segment lines used to form angle:
- Sagittal trunk line
- Sagittal thigh line
Angle measured: The anterior side of the angle formed between the sagittal trunk line and the sagittal thigh line.
Typical Values: 90 – 120o
Sample procedure
- Locate body landmarks and body segment lines
a) Locate the lateral hip centre point, lateral femoral condyle, and lateral lower neck point (or their approximations). The sagittal trunk and thigh lines connect these points.
- Lateral hip centre point – approximated by the most anterior point on the lateral surface of the greater trochanter.
- Lateral femoral condyle – point at most lateral aspect of the lateral femoral condyle.
- Lateral lower neck point – location can be approximated by the most anterior point on the acromion process if shoulder complex is well aligned with the trunk, or the centre point of a line between the C7 spinous process and the upper sternal notch.
- Sagittal thigh line – the line passing through the lateral hip centre point and the lateral femoral condyle
- Sagittal trunk line – the line passing through the lateral lower neck point and the lateral hip centre point.
- Measure the angle (using a goniometer)
a) Place the goniometer centre over the greater trochanter, or approximate lateral hip centre point.
b) Align the stationary arm along the sagittal trunk line, pointing towards the acromion. Align the moveable arm along the sagittal thigh line, pointing towards the lateral femoral condyle.
c) Read the value representing the anterior side of the angle, on the front side of the hip
References
- ISO 16840-1:2006 Wheelchair Seating, Part 1 – Vocabulary, reference axis convention and measures for body posture and postural support surfaces
-
Waugh, K and Crane, B (2013) A clinical application guide to standardized wheelchair seating measures of the body and seating support surfaces. Accessible as BPG3 from www.pmguk.co.uk/resources/best-practice-guidelines/bpg-archive
Further items can be found at www.beshealthcare.net. If you are interested in receiving further information on the topic, please contact 
Dr Barend ter Haar has been involved in seating and mobility for over 30 years, including lecturing internationally and developing international seating standards.


