Let’s get it clear: What makes a good positioning belt? Part 2. Adjustment
In previous issues of THIIS in the Let’s Get it Clear series, we have covered ‘What makes a good cushion?’ over six parts. An equally important component of many seating systems are the postural support devices (PSDs) provided with the seating to complement the cushion and back support elements. This is the second in a series covering PSDs, where we look at ensuring that a positioning belt can be attached and adjusted optimally for the user.
For a positioning belt or harness to be effective, it needs to be fitted tightly to the individual, whatever clothing the individual is wearing at the time. This means that there is a requirement to provide the means for both fine and gross adjustment to the belt or harness. In modern belts the fine adjustment comes usually from a strap near the buckle attachment, where minor adjustments for different clothing can be accommodated. The gross adjustment comes from when initially fitting the belt or harness by its means of attachment to the chair’s framework.
Fine adjustment
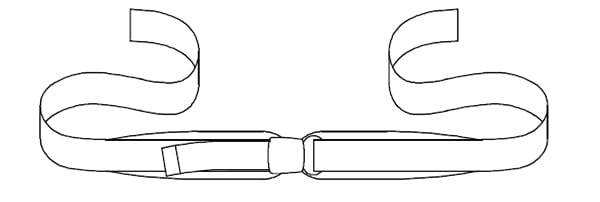
Pelvic positioning belts can come with either a single or double mechanism for fine adjustment, where a length of belt passes through the buckle, which can then be pulled on for final adjustment. Most buckles provide just a ‘single pull’ facility, from one side of the buckle, as found in push button and aircraft latch style closures (Figure 1).
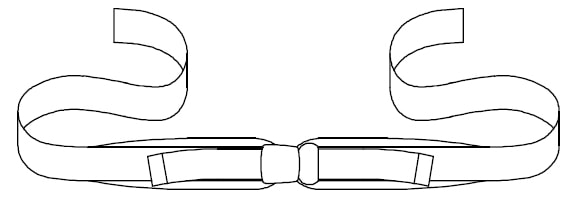
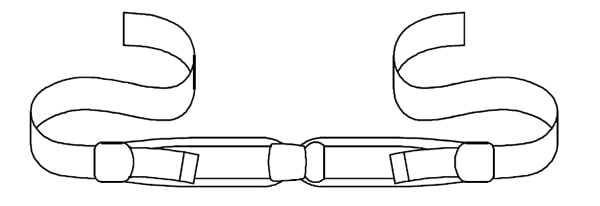
Some closures, such a side release buckles, allow for a dual pull adjustment, where there is an adjustable extension of the belt on both sides of the buckle (Figure 2). A similar extra degree of double adjustment is available with ‘rear-‘ or ‘reverse-pull’ set ups, where the adjustability is placed at a distance from the central buckle, with the pieces of adjustment belt placed at the further, or distal, ends of the pad (Figure 3). These double adjustment systems work well for individuals who wish to adjust their belts themselves, as the counter-leverage of the dual systems works more efficiently for them.

As a safety element, it is imperative that the belts do not slip and move out of position once they have been adjusted. The ISO standard BS ISO 16840-31 allows for a maximum of 5 mm (net 10 mm) slippage for each part of a belt relative to the adjacent part of the belt, under a repetitive load. Not all belts conform to this standard. It is well worth checking that the belts you use do!
It is really important to make sure you have adjusted the belt so that it’s tight enough. If the belt has been fitted properly in the first place (see below), then when fully tightened up, the pads on each side of the closure should ‘kiss’ each other. If there’s a gap, then further tightening should be carried out if possible.
Correct belt attachment points
This element of the fitting process is absolutely critical. Sadly, wheelchair users around the world have died from suffocation due to slipping (submarining) under their positioning belts, sometimes due to the belts having been placed at a 45o angle across the pelvis, like a transport safety belt. This was the reason that BS 86252 was produced, to give guidance and instruction as to the optimum placement of belts and harnesses to cover a client’s positioning needs, and, importantly, reducing the risks of harm to the wheelchair occupant. Sometimes the submarining occurred simply because the belts had not been tightened enough.
Gross adjustment
Gross adjustment is usually achieved at the ends of the belt or harness where they fit onto the chair frame. Some means of attachment allow for fast, easy, and fine-tuned adjustments, while others still allow for fine adjustment, but the process can be fiddly and time-consuming. Other methods, such as grommet fixtures mounted in the belt webbing through which the mounting bolt is screwed, do not allow for any webbing length adjustment, and worryingly also may not pass the BS ISO 16840-3 tests, as they have been known to rip out of the webbing.
Triangular end-fitting and three bar slide
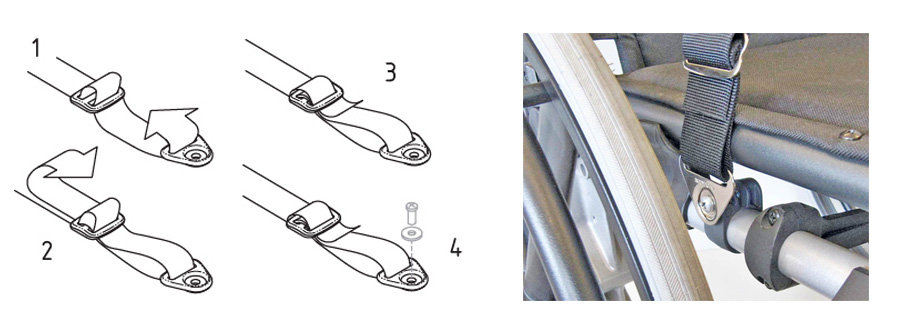
One system that is certainly rather fiddly and time-consuming to adjust is the triangular end-fitting and three-bar slide design. However, this design is still of value as it takes up the least space between the frame and adjacent hardware, such as wheels. A triangular end-fitting provides a means to loop the support webbing through an attachment. The end-fitting usually has a hole through which a bolt can be passed to mount to the framework attachment device. If using a triangular end-fitting, a three-bar slide is needed to fix the support webbing in place once adjusted to the selected belt length. The three-bar slide is in a figure of eight conformation.
The webbing needs to be threaded as per the manufacturer’s instructions. For example, the webbing can be threaded through the two slots in a downward direction, passed through the end fitting, passed back through the slots in an upward direction, and then (to avoid the risk of slippage) back through the slots in a downward direction again (see Figure 4).
Cam buckle end-fitting
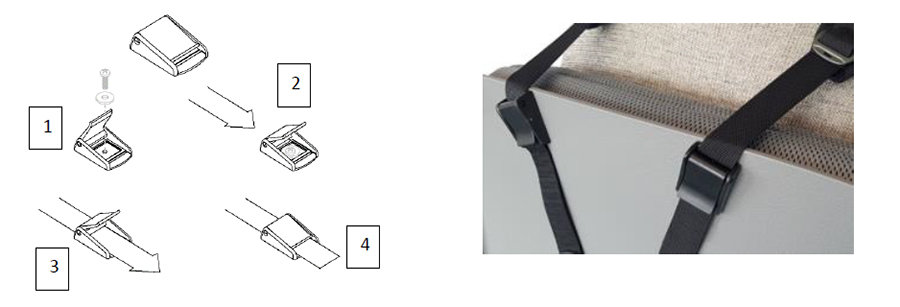
As an alternative to a flat mount and slide, a cam buckle end-fitting can be used to hold and adjust the support webbing (Figure 5). Look out that the cam buckle has been tested, with the webbing to be used, in accordance with ISO 16840-31 to verify that there is no slippage under the test condition when the clamp is closed.
Locking clamp end-fitting
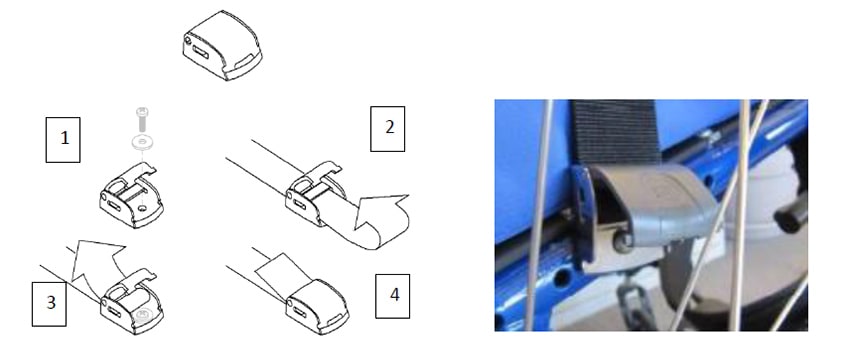
The ideal set-up is a locking clamp end-fitting which can be used to hold and adjust the support webbing. Preferably, the model chosen will be slim-line enough to fit the space between the chair frame and any other pieces of wheelchair hardware. Because the webbing is passed around a bar to grip itself (see Figure 6), it typically has higher strength and easier adjustment than other types of end-fittings. Again, the clamp should be tested, with the webbing to be used, in accordance with ISO 16840-31 to verify that there is no slippage when the clamp is closed, under the test condition.
In conclusion
There’s a lot to consider! Having selected the appropriate type of belt for the client, be it centre-pull, dual-pull, or rear-pull, then correct placement on the wheelchair comes next. The means of attachment of the belt to the chair will dictate the ease with which you will be able to make adjustments for the client, both initially, and subsequently as changes in size or clothing come into play. Getting this relatively simple exercise right, and selecting appropriately tested products, is critical for optimum performance, and more importantly, the safety and well-being of the client.
References
- BS ISO 16840-3 Wheelchair seating. Determination of static, impact and repetitive load strengths for postural support devices
- BS 8625:2019 Selection, placement and fixation of flexible postural support devices in seating. Specification

Further items can be found at www.beshealthcare.net. If you are interested in receiving further information on the topic, please contact barend@beshealthcare.net.
Dr Barend ter Haar has been involved in seating and mobility for over 30 years, including lecturing internationally and developing international seating standards.
Click to read more from the ‘Let’s get it clear’ series from Dr Barend ter Haar
https://thiis.co.uk/lets-get-it-clear-what-makes-a-good-positioning-belt-part-2-adjustment/https://thiis.co.uk/wp-content/uploads/2021/11/Figure-5.jpghttps://thiis.co.uk/wp-content/uploads/2021/11/Figure-5-150x150.jpgAnalysis & InsightsLet's Get It ClearNewsroomBES Healthcare,Dr Barend ter Haar,Let's get it clear,pelvic positioning,positioning belt,postural support devicesIn previous issues of THIIS in the Let’s Get it Clear series, we have covered ‘What makes a good cushion?’ over six parts. An equally important component of many seating systems are the postural support devices (PSDs) provided with the seating to complement the cushion and back support elements....Sarah SarsbySarah Sarsbysarah@thiis.co.ukEditorTHIIS Magazine